But why are the first attempts at drawing hair just as catastrophic as each other? The answer is simple: we too often complicate the task as a beginner! The trap is to start with the details, and to spend too much time on them, rather than splitting the drawing into simple steps and in a well-determined order.
Why? Because it’s easier to rush to draw what you see first (you know, the little dark spaces between the hair), than to step back and think about the drawing as a whole. Might as well admit it, it’s a classic mistake, we’ve all been there!
Indeed, any beginner has a preconceived idea of what surrounds him, often superficial and distorted. In reality, no human is born with a keen sense of observation. It is our personality and our experience that will determine our desire to observe the world. Fortunately, there is always time to start developing your artistic eye!
You will have understood by now: the sense of observation is the first quality of any good draftsman.
You have to be very curious and ask yourself good questions like: Is it worth spending 15 minutes drawing a lock of hair, when the overall volume of my hair is not correct?
How to draw hair is like anything else
As with everything we draw, drawing hair does not escape certain basic principles:
To draw a complex object (here the hair), it is necessary to simplify, then to divide the whole into several equally simple parts. And that goes for both structure and shadow rendering. I insist on this point. Here lies the whole secret of success in drawing.
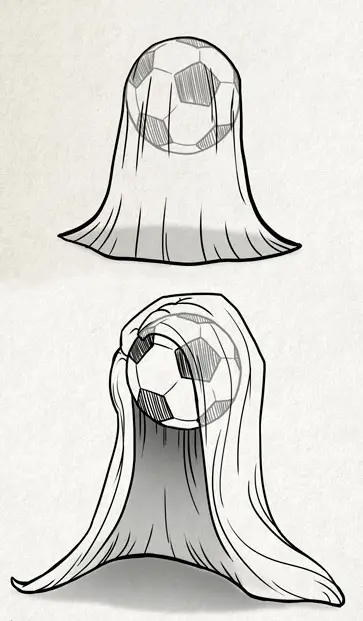
The hair is subject to gravity and will tend to take the shape of its support, especially the skull.
Hair has its own characteristics and properties depending on the individual. For example, light hair is more transparent, straight hair will have more reflections, fine and curly hair will look more blurred and diffused, and so on…
Movement and gravity
Many forces apply to the hair: gravity, artificial tension, natural tension, twisting, crimping, crushing, attachment, blowing air, and influence of other locks… We might as well be honest from the start: if the beginner neglects the construction steps, the drawing will be wobbly. We cannot make up for a bad construction with the rendering of the volumes, because if the construction is good, there is a good chance that the designer should have taken the time to understand the shape, the depth and the structure of what he draws. In absolute terms, we can compare hair to the fabric. It will take the shape of what is underneath (except for very straight hair).
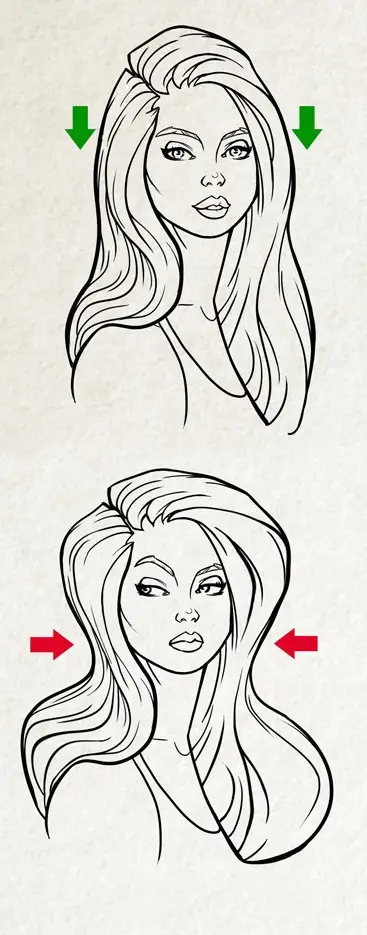
Gravity greatly influences straight and thick hair. This kind of hair will tend to verticalize following the shape of the skull. If we don’t pay attention to gravity, we can get results that are not only cartoonish or bizarre, but sometimes even impossible.
Learn to draw hair step by step
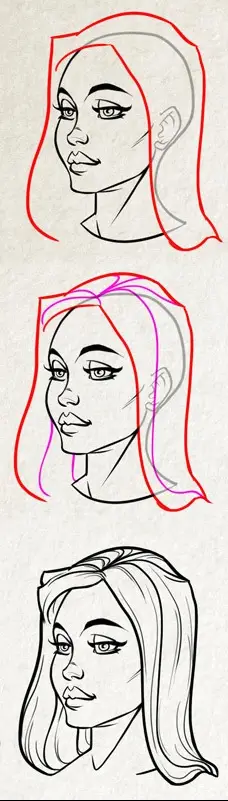
Here is a “step by step” you can follow to get out of it:
Represent the support from which the hair will grow: the head. The head is a three-dimensional element, which has depth. The hair will therefore also have depth.
Draw the general shape of the hair, representing the thickness, taking into account gravity and representing the invisible parts if necessary.
Subdivide by large strands/parts depending on the haircut (in most cases, 4 or 5 is enough).
Detail inside the wicks. Only spend a little bit of time on parting hair in a very small area. Keep an overview.
Value, shadows and reflections
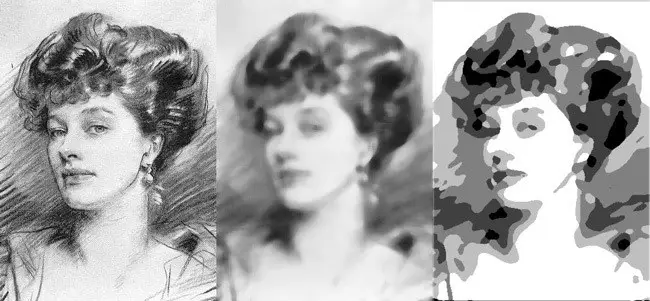
Sketch the overall volumes of the hair. Stay away from the detail of the drawing for the moment. Keep it simple. Once you have a good idea of the overall volumes, reinforce the contrasts. For front lighting, it is at the limits of a shape that we will find the darkest values and that the tonal transitions will be the most demonstrative. Boost highlights. If you are working with dry media, use a kneaded eraser to reveal the paper’s white. Lastly, place highlights (specular reflections).
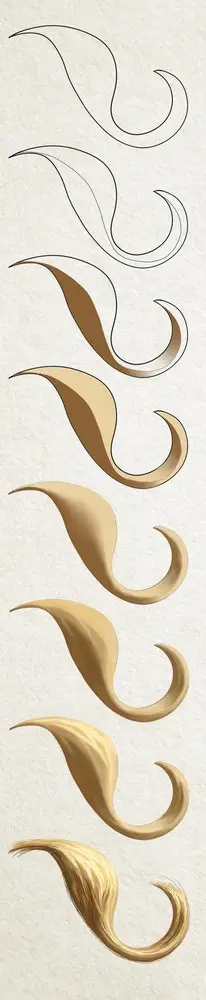
Draw a wick step by step
drawing a wick with digital painting
drawing a wick with traditional media
Common mistakes when you draw the hairs
Here’s a little recap of the common mistakes most inexperienced artists make: – To start by drawing the space between the hair or the locks before having simplified the hair.
– Too much pressure on the details between the hair or the strands without taking into account the overall volume of the hair
– To not take the time to represent the invisible parts when you encounter a difficulty.
– To represent a flat hair, without depth, without shortcut, by placing the tones awkwardly.
– To detail the hair too much compared to the rest of the face.
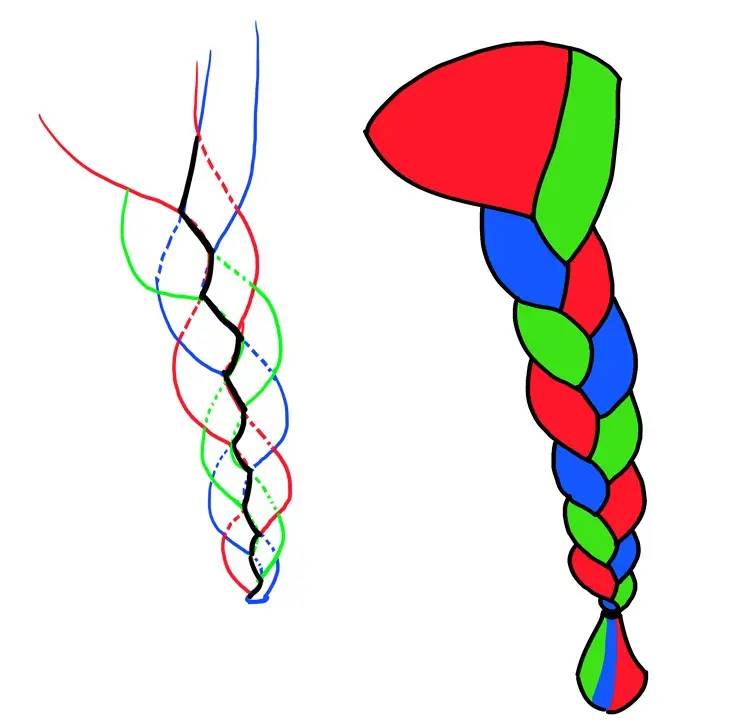
How to draw a braid
Sometimes, no matter how hard you try to draw something, you have to recognize your limits. Few artists draw correct braids without thinking. We tend to want to move quickly on this kind of “technical” drawing without ever really taking the time to understand what we are drawing. There are all kinds of hairstyles, but let me show you how to draw a correct braid.
Here is your exercise
Print the two drawings below and have fun representing different types of hair by following the steps mentioned above. Of course, you can take inspiration from photos if it seems too difficult for you to imagine (to obtain the drawing in high resolution, click on the image)
POINTS TO REMEMBER
Draw big shapes, then detail.
Try to perceive what you draw in 3D. Hair like any object is not flat.
Always draw what’s invisible to the eye to avoid mistakes. Construction is one of the keys to a good drawing.
Discover the secrets of one of the best professional illustrators
Unlock your artistic potential with our comprehensive video course on illustration! Whether you’re a beginner or an experienced artist, enroll today and start bringing your illustrations to life!